When the matter is about transforming mundane car snapshots into visually appealing storytelling, advanced editing skill is a must. But the query remains how can you make your car image editing better?
The most effective approach for enhancing your car image editing is to utilize professional tools like Photoshop or Lightroom. Pay close attention to lighting, masking, sharpening, or reflection enhancement to significantly improve your image quality.
If you are inclined to edit, you can even take advantage of the premium photo editor online and get your job done best.
Wondering how? Head to our comprehensive guide on how to edit car photos, exploring all tricks and techniques from directly the experts’ suggestions.
Editing Car Images Like A Pro In Lightroom [5 Pro Tips To Know]
If you’re just a beginner in this automotive image editing world, editing with the Lightroom tool would be the go-to suggestion for you to pick. No matter what, you can do this task with the help of a pro as well.
However, here are the straightforward processes to give a vibrant look to your extremely RAW car photo and make it a masterpiece.
Tip #1: Adding Motivated Light
This is a wonderful trick in Lightroom you can use to give it a vibe that the sun is coming on. There are several tools in Lightroom you can to adjust the motivated light of your automotive car, Such as radial and gradient masks, brush tools, directional lighting panels, and so on.
However, you can enhance the lighting of your car photo using the graduated filter as follows:
Method #1: From the develop module, tap on the Graduated Filter tool. Select the points on your image where you want the effect of the filter and drag it in any direction. Use the Shift key to set the filter either horizontal or vertical.

Method #2: Once activating the filter, press Shift + O or click on the color icon beside show overlay to change the color of the mask.

Tip #2: Sharpening
If you want to make your car image softer and limit distraction, nothing would be better than sharpening the edges of your photo. Don’t worry, it is quite easy to do so in Lightroom.
For instance, simply head to the detail panel where you will find the image sharpening adjustment sliders.

The sharpening tool has four adjustment sliders including Amount, Radius, Detail, and Masking.
- Amount slider: Controls the extent of sharpness
- Detail slider: Controls the amount of sharpening applied to details.
- Radius slider: Controls the thickness of the edge where the contrast is applied.
But here I would recommend adjusting the masking tool to the right as much as the edges highlight without adding any noise.

Tip #3: Adding Exposure & Details To Your Dark Photo
If you are just struggling with the dark shorts of your car photo and thinking about how to edit it, I have a nice trick for you. Just open your lightroom and head to the Radial Gradient.

The filter is quite effective in highlighting the specific portion and reducing the exposure, saturation, and sharpness of the outside portion of the image.
To do so, adjust the exposure, contrast, and other sliders as much as it fits naturally with the other parts of the image.

Note: Over-optimizing the radiant filter may cause the image to look too painted and featured.
Tip #4: Using The Dodge & Burn Tool
When it’s the fact about emphasizing the important details on particular parts while darkening the rest of your car image, the Dodge and Burn tool in Lightroom will help you to do that.
To apply the Dodge and Burn effects in your car image, here are the simple steps to follow:
- Head to the Develop tab and tap on the masking tool to create new maks.

- Then, left click on Create New Mask select the brush tool, and adjust it depending on the area that you want to edit. It’s better to set the Flow and Density values to 50% to make the effect more natural.


- After that, adjust the exposure and contrast after selecting the dodge and burn tool from the custom option.

Tip #5: Removing Dirts & Reduce Noise
Along with other editing, removing specks of dirt, dust, and other blemishes from the image is the same crucial to making a car photo look cleaner and more professional.
Using the advanced spot removal tool in the lightroom, you can make this task far easier. To use the spot removal tool, follow the simple steps below:
- First off locate the spot healing tool from the Histogram window or simply you can press Q on the keyboard.

- Now go to Window > Show Toolbar, to show the Visualize Spots mode or use the shortcut ‘T’.
- Adjust the slider to inspect the dirty points on the image. When done, tap on the spot removal tool on each spot and erase it.

- You can even adjust the spot size, feather, and opacity using the spot healing brush. To completely remove the spot, always set the opacity to 100.

Well, these are all the pro tips you can apply to edit your car photo and make it stand out and super eye-catching. Now, let’s head to some professional ways to edit car images.
How To Edit Car Photos In Photoshop [Advanced Techniques To Know]
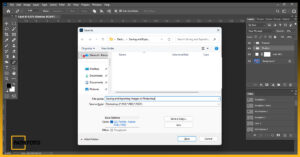
If you are looking forward to a professional touch-up on your car image, you can utilize Photoshop – the most powerful and versatile tool in the photo editing industry.
It provides granular control over almost every element of a car image like lighting, colour, textures, reflections, backgrounds, etc. This level of control allows skilled editors to craft images to a very high standard.
Here are some major offerings from Photoshop, you can utilize to enhance your vehicle photo visibility:
1. Clipping Path
If you are struggling with a complex or multicolored background of a vehicle photo, clipping path in Photoshop would be a great start for you.
It is the most powerful element in Photoshop that allows users to cut out or “clip” an object and showcase their car photo in a completely white or transparent background.

To do so, it involves a digital pen tool that helps you to draw the outline on your object and allows you to cut it out from the background with precision and accuracy.
Though it seems a simple pen tool, the overall processes require a high level of attention to ensure seamless detailing.
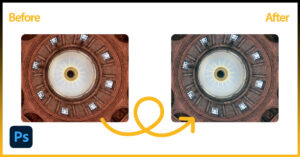
2. HDR Effect
Along with the background setting, you can give a high-end DSLR effect on your car image for more crisp details and sharpness. Using the sharpening and clarity effects in Photoshop, you can make car photos look like they were shot with a high-end DSLR camera lens.
For instance, optimizing blur background in Photoshop is an effective option that will allow you to bring out details in the car’s body, rims, interior, etc.
To add a blurred photo background, go to Filter>Blur Gallary>Tilt Shift. Now set your blurring level and see the magic!


3. Recoloring
In case you own a car-selling industry, certainly you would want to showcase your models in various forms. That’s the point, photoshop’s re-coloring technique would come first to help you out.
The Recolor feature in Photoshop will allow you to change the color of the image without even affecting the overall contrast or brightness.
Anyway, there are a few ways to recolor in Photoshop like:
Method #1: Changing the Hue
Press Ctrl+U and open the Hue and Saturation menu. Now adjust the hue of the background by using the slider.

Method #2: By Creating a Hue Saturation Layer
Head to the Adjustments panel and select the Hue/Saturation. Toggle the Colorize box and adjust the hue to your desired color.

Method #3: Color Layer
As the Hue/Saturation layer, go to the Layer > New Fill Layer > Solid Color. Then click on “OK” and select your desired color from the pop-up menu.


Method #4: Using Brush Tool:
With the brush tool, you can especially change the color of the area that you want. Just fill your brush with the color you’d like and paste it into that area.

4. Sky Replacement
With a plain, clear sky in the background, the focus remains entirely on the car without any distracting background elements. This highlights the car as the main subject.
If your recently shot car image has so boring sky, fret not! With Photoshop, you can easily deal with this task. It is simple:
- First, choose the car where you want to change the sky.
- Open it in Photoshop>go to Edit> Select Sky Replacement from the Edit dropdown menu and the sky replacement panel will appear.

- Now choose a sky from the listed options shown on the screen and adjust it with your car image.

- Finally, fine-tune your new sky simply by the brightness and temperature slider from the tool and you are good to go!

Note: In case you don’t find the sky replacement tool in the drop-down menu, update your Photoshop with the newest version.
5. Auto Drop Shadow
In order to add a sense of realism, you might need an auto drop shadow in your car image. Photoshop auto shadows will help you visually lift and separate the car from the background, making it stand out more as the main subject. This draws more attention to the car.
- To do so, open Photoshop and select the layer of the shadow you want to give.

- Select the FX icon at the bottom of the Layers panel and tap on the Drop Shadow.

- Finally, select the Structure and quality effects and click on “OK”


6. Re-Touch Up
Car Photos Retouch Up is another advanced editing service that you can easily perform in Adobe Photoshop. By re-touching your car photo, you can easily eliminate small flaws like dust spots, water droplets, spiderwebs, chips, scratches, etc. that may detract from the look of the car.
- Tap on the Clone Stamp Tool from the toolbar.

- Now set the capacity of the tool on the basis of image requirements.

- Then use the clone stamp tool and select the area you want to re-touch up.

Choosing The Best Automotive Photo Editing Services Online
When the fact is about car retouching, you will find a different range of professional car photo editing services online to choose from. Professional photo editors have years of expertise and experience in editing photos at a high level.
They understand advanced techniques for retouching, color correction, manipulation, etc. to achieve the best results that you could do on your own.
Here is a short list of professional photo editing services you find available online with their pricing details:
1. Fotor
If you are looking for an online photo editor and design tool to make your car photo editing super fast and easier, you can head to Fotor without thinking twice. Their user-friendly interfaces make it far more convenient for you.
You just need to upload your car image there and you’re done. Their enhanced AI image generator will be enough to complete all your tasks in seconds starting from improving color and lighting to sharpening the details.
Pricing: Fotor offers its editing features at $8.99 monthly billing or $39.99 per user at an annual rate. Free trial and free version available.
2. Spyne
Spyne is the most renowned photo-editing platform among automotive retailers that offers an instant AI-based interface to edit photos as the users demand.
With the ability to change the car photo background, you can easily eliminate any distracting elements from the image and make it fine-tuned. Other exciting features from Spyne include:
- Adding a logo through a masking plate
- Adding reflection
- Generating real-life shadows
- Making your car windows tinted, and so on.
Pricing: The minimal pricing for Spyne starts at only $0.12 per image.
3. Slazzer
Meet another professional car editing and design tool online Slazzer that helps you to create stunning car images in seconds. It is an AI-powered tool run by computer vision algorithms that allows you to remove any dull car background within just one tap.
It widely supports Windows, Linux, cloud servers, and macOS, or download the app on any of your smartphones. The key features of Slazeer include:
- Providing high-quality and smooth cut-outs even for images with lots of distractions.
- Drag-drop functionality to enhance productivity.
- An integrated API for the developers for commercial use
- Generate images rapidly with outstanding results.
Pricing: Slazzer offers its premium plans in a few different tiers starting at only $0.12 per image at a $36 monthly deal.
Find The Best Manual Automotive Photo Editing Service
Beyond any doubt, there is nothing better than manual editing by an editor that allows for a level of artistic judgment and attention to detail that often AI services lack. This is because a professional editor can create more subjective and stylistic editing choices which an AI can’t.
So, if you also desire to have manual editing for your automotive photo rather than AI service, we have a great suggestion for you Path Foto.
Here is the short review:
Path Foto has been one of the best image editing services for 10 Years, providing quality services without even any single touch of the AI models. The best advantage of their clipping path services is a dedicated team who are always ready to edit your car image like hand drawn.
Beyond just rendering clipping paths, they offer a good range of services including changing backgrounds, car shadow making, color correction, photo retouching, and so on.
Key Features:
- 24-hour team support with dedicated customer support team
- Less than 24H delivery
- Can deliver up to 2500 – 3500 car clipping paths daily
- Uses Dropbox or FTP to deliver the completed edited files
- Also stores and retains the client’s files for up to 7-30 days after completion at no additional cost
- Unlimited revision service
Best Photo Editing Software To Edit Car Images On PC and Smartphone
When it comes to processing and enhancing photos of vehicles on your PC or your smartphone, certain software can help you here. Photo editing software provides specialized capabilities to get magazine-worthy edits every time.
In this section, I am going to cover our top-picked free car photo editing app both for PC and mobile versions:
1. Snapseed
As a beginner-level photo editor, if you are looking for some handy software in your smartphone, I’ll recommend must go with the Snapseed.
It equips all the premium tools starting from filters, and color correction, to cool effects, enough to transform your existing image into a masterpiece.
In addition to that, with just a few taps, you can adjust the contrast, saturation, brightness, and curve adjustment element to make each corner of the car fine-tuned. Other core elements include:
- Vignettes
- Tune Image
- Selective.
- Rotate.
- Perspective.
- White Balance.
- Brush.
- Lens blur
- HDR scape
2. Canva
Canva is another amazing tool that equips all the pro features, enough to transform your car photo into a captivating story. Each of the tools is useful for basic cropping, resizing, filter effects, and simple cleanups on car photos.
Plus with their offered filter options like vintage, faded, pop art, etc, you can quickly style car photos, even on your phone as well.
What’s more? the easy drag-and-drop interface makes all the functions user-friendly.
3. Pixlr
Pixlor is the top editing online photo editing platform for a creative editor to enhance the performance of their editing skills. You will get this versatile editing both in web-based and app form.
It mosts all advanced features in the most user-friendly interface and easy-to-navigate menus, making it a popular choice for both beginners and professionals.
Starting from, adding layers to fine-tuning the details, color correction or exposure details are in one package, enough to get the most control over the image quality.
4. GIMP
If you are looking for some alternatives to the paid programs like Photoshop, I’ll suggest to choose the GIMP for perfect photo editing.
Don’t worry, it’s simple, fun, and free but most advanced features that you get in premium tools.
You can crop the images to improve composition, correct the white balance, color correct, contrast setting, or adjust the saturation and luminosity-whatever you want with it!
Getting The Best Car Photos Editing Skills in iPhone
Though beyond any doubt, the iPhone is enough to capture amazing pictures with its advanced built-in cameras, you can use this to take your edits to the next level as well. With the right apps and techniques, the iPhone provides powerful photo editing capabilities to enhance your automotive shots.
For instance, you can go with basic built-in apps like PicsArt, Snapseed, VSCO, and so on. Besides, to get more control over your car editing skills, you can download advanced image editing applications like Adobe Lightroom and Pixelmator Photo.
Anyway here are some more tips you can apply to get enhanced photo editing skills on your iPhone:
- While editing car photos on your iPhone, it’d be good to use restraint with filters that overly obscure, disguise, or conceal details of the car itself.
- If required, you can use the vignette tool to draw more attention to the vehicle in your car photo.
- Use clarity, sharpening, and selective adjustments to locally boost contrast, saturation, etc in specific parts of the image.
- If you are editing night car photos, consider some basic things like correct exposure edits, contrast setting, proper shadow correction, background changing, and so on.
Technical Considerations For Improving Car Image Editing
Although that’s true, editing car images like a pro is not child’s play, however, knowing some technical things and practice plays the most part in improving your car image editing.
Here we’re going to highlight the five basic but crucial technical considerations that one should always keep in mind while editing images no matter if she/he is an amateur or pro.
1. Shoot The RAW And High-Resolution Image
When capturing the image of your car, you should always click RAW images and ensure the high resolution. It will offer the highest amount of data and scope of flexibility in the editing process.
For instance, if you are taking a static car photo, you can follow a few tricks below in camera settings:
- Use a narrow aperture of about f/8 or up to keep both cars in focus. If you want to blur out the background, use a wide aperture f/5 or lower.
- Use a low ISO setting, perhaps for about 100.
- Use a quick shutter speed and select auto white balance while clicking the car image.
2. Understanding The Power Of Perspective Correction
Perspective correction is one of the vital technical considerations for enhancing car image editing.
Through this one can rectify the distorted image caused by the camera lens and capture the car image aesthetically.
Here you need to adjust the angles and the proportions to achieve an accurate and visually pleasing image. In this case, you can use Adobe Photoshop or Lightroom.
3. Adjustment Of The Highlight And Shadow
Adjusting the highlight and the shadow is a powerful technique to enhance the overall visual impact of the image.
Using the software tools, you can selectively brighten or darken the specific areas of the car image. It will effectively balance the exposure and will ensure that the car is evenly illuminated.
4. Creating Visual Effect
Dynamic retouching is the advanced technique by which one creates visual effects impacting car images.
In this technique, you need to enhance certain aspects of the car effectively. For instance, design features, lines, and curves of the image. It will create a more dynamic and captivating representation.
5. Color Correction
In case you want to enhance the car image editing, correcting the imbalance color and enhancing the vibrancy impact significantly.
The process involves adjusting the color tones, contrast, and saturation of the image. It will help to create the specific mood that you want in your car image.
FAQs:
What’s the best software for advanced car photo editing?
For professional-level editing, Adobe Photoshop would be the right choice for you, features all top programs for car photo post-production. Besides, you can use the lightroom as well to edit your image in a simple and user-friendly interface.
How do I make car reflections look stunning?
It’s best to use polarizing filters while shooting to darken and saturate reflections. Then in editing, selectively sharpen and add contrast only to the reflected areas to make them really stand out.
How can I sharpen car details like chrome edges without over-sharpening?
Masking would be the perfect suggestion for you to selectively sharpen just the areas you want sharper, not blanket sharpening. In Lightroom, you will get the Apply “Clarity” to get the job done.
How do I add drama and style to my car photos?
Light leaks, lens flares, gradients, and colored shadows are some of the effective methods to add drama and styling to car photos. Besides, try to use reflectors in the car to bounce light and give it a more balanced look
How to make my car image more consistent for product photos?
To make an image more consistent, concentrate on the camera position during the shoot and make sure the camera and tripod are in the same position. Also, shoot in a controlled studio with proper lighting. Focus on the angle and background as well.
In Closing!
When it’s about taking a car photo editing is to the next level, you need both creativity and technical skill. For instance, pay close attention to the lighting quality in the shots you capture. Then use some premium tools like Photoshop or Lightroom to optimize adjustments, direct the viewer’s eye, and add visual interest through compositing and effects.
Well, that’s all here about how can you make your car image editing. Hope our comprehensive guide will be enough to assist with the accurate editing instructions. If still you have any queries, just hit through a comment and get the best advice from our experts.