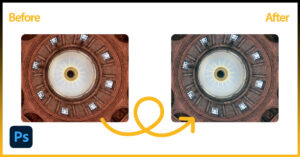
Are you just struggling to fit your image perfectly into a new design or format? You probably want to add more space without losing the essential parts of your image. Don’t worry! Photoshop offers a powerful solution—extending your image background.
As a beginner, I faced the same challenge, wondering how to extend background in Photoshop. But it’s easier than you think.
Start with the Crop Tool and enlarge the Photoshop canvas outward. Then use the Content-Aware Fill tool and fill the new area seamlessly. This quick method lets you adjust your image dimensions effortlessly.
But that’s just one technique. Keep on reading to explore the step-by-step process of extending a background in Photoshop using different techniques.
We’ll even also touch upon alternative methods on how you will tackle those trickier, more complex backgrounds.
Why Do You Need To Extend Your Image Background In Photoshop?
While Photoshop editing, it is not uncommon that you might need to enhance your image visuals or need more space for further editing. This is the time when extending your image background is a must.
Anyway, here are a few more major reasons why you might want to extend the background of your image in Photoshop:
1. Change the Composition:
If you want to add more space to the image to reposition your subject or include additional elements, you will need to expand your image background. Extending the background will create a large space for you to work with.
2. Adjust the Aspect Ratio:
In most cases, you might need to adjust the image dimensions to fit a specific format like for a social media post, web post, or a printed brochure. This is the time, stretching the background will help you fit your image without cropping essential parts.
3. Fix Imperfections:
Have you accidentally cropped out part of the background? Image background extension can help you to recover the lost area. Even it is a great method if you want to remove distracting elements on the edges and create a cleaner composition for your image.
How To Extend Background In Photoshop?
Now I’m going to explore some of the effective techniques to extend your background seamlessly. Each method offers unique advantages, ensuring that you have the right tools for every situation. Let’s move on.
Method #1: Crop Tool
The crop tool is one of the most handy tools in Photoshop you can use to extend and resize your image background.
Here are a few simple steps you can follow:
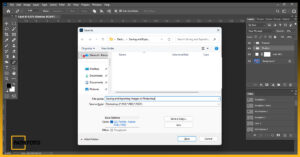
Step #1: Start by opening your image in Photoshop. Simply go to File>Open and launch the image that you want to edit in your Photoshop workspace. As a shortcut, press ctrl+O and open your desired image.

Step #2: Now go to the toolbar and find the Crop tool from the menu. You can simply press C to select the tool directly.

Step #3: After selecting the crop tool, go to the top menu bar and select Content-aware. Keep in mind you have to uncheck the Delete Cropped Pixels option for this method.

Step #4: Press Alt and click on a corner (You can press shift if you want to drag one side only) and drag on the crop border outward from the image. Extend the image as much as you want. This will expand the canvas around your original image.

Step #5: When you’re satisfied with your extension, hit Enter or click the checkmark on the top of the screen to accept the crop.
Step #6: Content-aware will intelligently analyze the existing image data and expand your image background based on patterns and textures it finds.

[Be aware this technique works well for simple backgrounds with repetitive patterns or gradients.]
Method #2: Content Aware-fill
Beyond the crop tool, you can choose the content aware fill to expand the image in Photoshop. It is quite straightforward to use this tool:
- Open your image in Photoshop. Now use the crop tool and stretch your image background following the above instructions.

- This is the time for selection. Locate the Rectangular Marquee Tool from the toolbar.

- Dag the tool and select the area of the background that you want to expand.

- Go to the Edit menu at the top and choose Content-Aware Fill. A Content-Aware Fill window appears. Now you need to choose some optional adjustments.


- Adjust the setting on how you want to fill your background area in Photoshop.
- When done, Click OK. Photoshop will analyze the selected area and use its patterns to fill the transparent background area around your image.
Method #3: Content-Aware Scale
If you want to get more control over extending your image background in Photoshop, the content-aware scale will be the go-to suggestion for you.
Unlike Content-Aware Fill which relies solely on the immediate surroundings, it offers more control and precision and lets you target different areas for an extension on various sides of an image.
This is a great tool to choose if you have an image with an uneven background extension. Anyway, follow the below simple steps to use this tool and stretch your image effectively:
- With the image open in your Photoshop workspace, go to the toolbar and select the crop tool from the menu.
- Now click and drag the handler of the crop and stretch your image background from wherever you want. Click on the checkmark on the top to accept your edit.

- Now go to Edit and select Content-aware scale from the drop-down menu.

- Press Shift + Alt at the same time and click and drag any of the corner handles on the image border.

- By default, the content-aware scale analyzes the entire image and generates a new background for your extended canvas.
The tool is much more effective if you’re working with landscape images. It can easily stretch or squash natural elements in the image like water, grass, and bushes without any distortion.
Still, it is not recommended to go with a portrait image and an image with a busy background. Keep on reading to learn many more amazing ideas.
Method #4: Clone Stamp Tool
The Clone Stamp tool is another great tool in Photoshop to extend your image background by sampling the pixels. Here is how you can use the tool in this instance:
- Open the image in Photoshop and go to the layer. Unlock your background layer. Click on the lock icon to unlock it.

- Now go to the toolbar and select the Clone Stamp tool from there. Hold down the Alt key (Windows) or Option key (Mac) and click on a clean area of your background. Photoshop will set this part as a source for cloning.


- Release the Alt or Option key and click and drag over the area you want to extend.

- As you drag, Photoshop will clone the source area you sampled and effectively extend the background.
Additional Tips:
Here you can adjust the brush size to match the size of the pattern or texture you’re cloning. You can also adjust the opacity of the Clone Stamp tool if you want to create a more seamless blend between the cloned area and the existing background.
Method #5: Extend with Image Extend Addon
Image Extend is an amazing third-party plugin that will help you to make an image larger by extending the edges without any quality loss or blurring. It analyzes your existing image and fills the gap with the same content.
Also, as it is not pre-built, you need to download and add this to any of your Photoshop versions CC 2015+.
When done, follow the below simple steps and extend your images:
- With the image open in your Photoshop, go to Windows>>Extensions and select the Image Extend add-on.

- Image Extend adjustment window will pop up on your screen as in the below.

- Start by selecting the Content-aware. Then set the pixels for the Top, Right, Bottom, and Left sides of your image.

- When done, click on Extend and see the magic!

Method #6: Generative Fill
Now if you are wondering about portrait images for extending the background, Photoshop Generative Fill AI comes into play. Your portrait image may have a simple background in a solid color or a complex background featuring objects, textures, or variations, Generative Fill is powerful for handling both.
Generative fill is a powerful AI-powered tool in Adobe Photoshop 2024 version that allows you to add, remove, or modify image content in a non-destructive way.
This is the newly launched feature from Adobe, which mainly runs through the prompts provided by the users.
Anyway, if you have an intricate background with multiple elements, patterns, or variations, this is the time to utilize this efficient tool as follows:
Step -1: With the image uploaded in your Photoshop workspace, select the Crop tool from the toolbar and extend the canvas.

Step -2: With the selection of crop tool, set the aspect ratio of the top tool menu to ratio and keep the Width and Height boxes empty.

Step -3: Now you will have to make a selection of the area that you’ve just stretched. For instance, go to the toolbar and choose Rectangular Marquee Tool.
Step -4: Drag the tool on the added part of your image and it will make a selection around it.
Step -5: Make sure to overlap the selection outline slightly with the existing image. This will give a smoother and more natural-looking transition between the generated background and the original image.

Step -6: Now go to the window, check the Contextual Task Bar and the Generative fill pop-up will appear in your Photoshop workspace.

Step -7: Click on the Generative fill to enter the prompt. Now add a text prompt to guide the AI towards a specific background type.
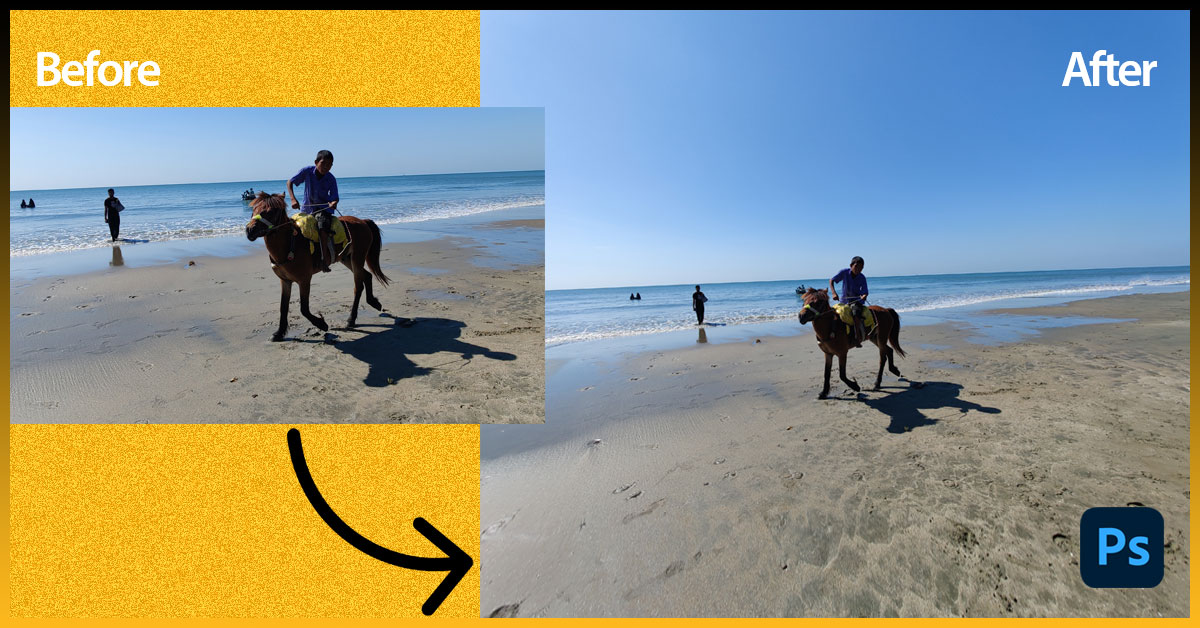
For example, if your image is a landscape with mountains in the background, simply type “clear blue sky with fluffy clouds” and click the Generate button to create a more complete sky.
Or you can leave the prompt box empty if you are extending an image. The Generative fill AI will analyze your photo and fill the area that matches your original photos.
To get better results,
Go to the Properties Panel and select AI-generated content to add to your image. Click on the thumbnails to see the previews of your selection.
How to Stretch a Complex Background in Photoshop?
If you have a complex background featuring intricate details or multiple elements, it is not possible to get the expected results following the above instructions.
So, what’s the solution? Let me share some of the effective steps in this instance:
[Before moving ahead, if you want to change such a complex background, here is our effective tutorial you can check out.]
Step -1: Start by opening your image in the Photoshop workspace. Go to the layers panel and unlock the background by just tapping on the lock icon.

Step -2: Now go to the toolbar and select the crop tool from the menu bar. Or press C to select it directly.

Step -3: Click and drag the handles of the cropping area outward as much as you can to extend your image background. Hold down the Alt key while doing so, to extend at the same ratio from both sides.

Step -4: Anyway, when done, press Enter or click on the checkmark from the top menu bar. Go to the tool and select the Quick Selection tool. Go to the top menu and click on “Select Subject” to quickly select your image subjects.

Step -5: Head to Select from at the top and choose Save Selection from the down menu. A pop-up will appear on your window. Rename the selection and click OK to save it.

Step -6: Now click the Edit menu and select Content “Content-Aware Scale” from the dropdown menu. After selecting this tool, go to the top menu bar and change the Protect option to Subject.

Step -7: Hold the Shift+Alt key and drag the handler on both sides to fill your image background. Click on Checkmark and save your selection.

Retouching An Image After Extending Background
After extending the background in Photoshop, you may need to retouch an image to give it a perfect look. This mostly happens when you find the extended background does not match the color, brightness, or shadows of the original background. Last time, I found the texture in my extended area was noticeably different.
Anyway, follow the below tricks and give your image a finer look:
Method #1: Blend Modes and Adjustment Layers
If you notice inconsistency in the colors, brightness, and contrast in the extension area, you can utilize the blend modes and adjustment layer to fix it.
- Simply create adjustment layers such as Levels, Curves, or Hue/Saturation and lip them to the extended background layer.

- Adjust the setting of the layers to match the color and tonal range of your image.
Method #2: Brush Tools
Photoshop equips a wide range of brush tools that allow editors to fix imperfections and blend the colors of a distorted image. You can choose any of the below ones:
- Spot Healing Brush Tool: This tool automatically samples the area around the area you paint and effectively cleans out minor spots, dust, or artifacts in the extended background,

- Healing Brush Tool: Use this tool and make sure that the texture, color, and lighting match perfectly with the surrounding areas.

- Patch Tool: Unlike the healing tool, it works by copying pixels from a source area and blending them into a target area. Use this tool and fix the inconsistencies of the extended part of your image.

Expand Image Background Instantly With AI Image Extender Online For Free
If you are new to background extension and don’t want to learn more complex techniques in Photoshop, you can experiment with Ai image extender free as a convenient option to edit your image.
There are several AI image extenders available online, featuring different functionalities and control options. The best part is that some of the tools are completely free to access.
Anyway, before you get confused amidst the vast availability, let me share some of the best and go-to AI image extenders online you can choose from:
| Ai Image Extender | Best Features |
| Piscart | Offers free service High-quality result Instant image extension option Offers image resizing options after expanding your image Seamless blending with the original image. |
| Fotor | Use power AI to expand and autofill your image Easy-to-use interface Automatically extend the image with generative detailsAfter stretching, you will have image customization optionsWorks with any of the images, starting from simple to intricate image backgrounds. |
| YouCam Online Editor | Seamlessly expand the image for all ratios.Instantly expanding optionQuick export to your deviceQuick and easy-to-use interface Maintaining high image qualityAvailable for free. |
| Kapwing | Maintains the quality of the original imageExpand images in just 3 steps: Upload, extend, and export. Offers to improve your image quality option Resizes images without distortion or compromising quality Completely free to start |
FAQ:
Can I undo extending my image background in Photoshop?
Yes, you can undo extending your image background in Photoshop. Go to the history panel to revert to an earlier state or press Ctrl+Z (Cmd+Z on Mac) to undo your changes.
How to enlarge my image with Canvas size in Photoshop?
To resize Canvas in Photoshop, go to Image > Canvas Size. Now enter the new dimensions, select the anchor point, and click OK to apply the changes.
How do I extend both sides of my Canvas in Photoshop at the same time?
Start by selecting the crop from the toolbar. Then hold down the Alt key or (the Option key on a Mac) on your keyboard and drag the handler. It will extend your image outward at the same time on an equal amount from both sides.
In Closing
Well, that’s all here from us today! Throughout this blog post, we have highlighted a few effective methods on how to extend background in Photoshop. For simple background, content-Aware Fill, Content-Aware Scale, and Crop tool.
But when you have a complex background, you need to make a selection after extending the canvas.
For instance, Photoshop generative Fill can also be used. However, if you face difficulties in implementing any of our suggested methods, don’t hesitate to reach out to us. Our expert editors are always here for your best assistance.