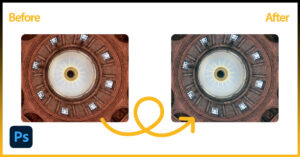
In this fast-paced photo editing world, cropping is always an essential part. It allows you to remove unwanted background elements and bring attention to the main part of your photo. This is more crucial if you are editing images for social media where you require a square format, while a photo for printing needs a specific aspect ratio.
A clear idea of “how to crop and resize images in Photoshop” will ensure you the best performance in this instance:
- Go to the toolbar in Photoshop.
- Click and drag on the image to create a cropping box.
- Use corner handles to adjust the size and position of the crop.
- If needed, adjust the resolution and aspect ratio to resize your image as your requirement.
Keep on reading our guide and explore many more tips and tricks to crop and resize an image in Photoshop.
How To Crop And Resize Images in Photoshop Without Losing Quality?
Here is the step-by-step guide you can follow to custom crop and resize images effectively in Photoshop for different platforms online:
Step -1: Open Your Image File In Photoshop
All you need to start by arranging your Photoshop workspace. Upload your image in the workspace to get started.
To do so, simply go to the File on the top of the screen as you can see in the below image and then Open. Click the image you want to edit through cropping and resizing and it will open in your Photoshop. As a keyboard shortcut, press Ctrl+O to upload your image directly.
Step -2: Select The Crop Tool
Now this is the step when you need to select the crop tool in Photoshop. Every version of Photoshop has a specialized crop tool in the toolbar that lets users select an area of an image and remove other parts outside of the selected area.
This is the most handy tool if you have a distracting object on the edge of your photo or have some empty space around the subject. The crop tool lets you cut off these areas and tighten up your composition.
You can even use it to adjust the proportions of your image to fit any specific format like square or rectangular.
Step -3: Crop & Resize An Image By Dragging
Anyway, go to the toolbar and select the Crop tool from the toolbar menu. Or as a shortcut, press (C), and this tool will automatically select.
Once the Crop tool is active, you’ll see a rectangular border appear around your image. This is the crop area. You can adjust this area by dragging the handles:
- Corner handles: Click and drag any of the corner handles to resize the crop border. Dragging outwards increases the crop area while dragging inwards reduces it.
- Side handles: Click and drag any of the side handles to adjust the crop border along that side.
- Drag Inside the Border: Click and drag anywhere inside the crop border to reposition the image within the selected crop area. This allows you to adjust the framing without changing the crop size.
Step -4: Adjust Your Cropping Tool
While selecting the crop, go to the top bar menu and you will find several options to adjust your cropping. Let’s disclose one by one:
i) Straighten:
This is the built-in straighten tool with the crop tool. With the selection of this option, you can correct the tilted horizons or other unwanted tilts in your image.
To use this option:
- Go to the top bar menu and look for the Straighten tool.
- Click and hold on the Straighten button.
- Then drag your mouse across a straight line element in your image that should be horizontal or vertical.
- As soon as you release the mouse button, Photoshop automatically rotates the image to straighten the line you drew as a reference.
- The crop border adjusts accordingly to accommodate the rotation.
ii) Angle:
Now right after the straighten tool, you find the Angel option to set your crop image in different angles.
This mainly includes the Rule of Third, Grid, Diagonal, triangle, golden ratio, and so on, having different features. Select any of your desired options and reshape your crop image through the crop tool handler.
iii) Crop Tool Settings:
Just after this option, there is a settings icon that has several options, highlighting how you want to see your edited image. This includes:
- Use classic Mode
- Show cropped area
- Auto center preview
- Enable crop shield
Also, you can change the color and opacity of your image.
Step -5: Resizing Your Image
Well as a beginner, you may find it handy to crop your image by freely dragging the crop tool handler. It primarily focuses on defining the area you want to keep in the image. But the problem is you won’t get the expected result in your image.
Things will be like this, if you have a specific size requirement for the final cropped image (square for social media), you might choose to resize the crop area to those dimensions while cropping. This will help you adjust your image either by enlarging or decreasing the size.
For instance, here are a few effective methods to resize your photo in Photoshop without losing quality:
i) Resize Your Image Manually
Let’s start with a very basic method to resize and adjust the pixels of any image in Photoshop. Simply go to the Go to Image > Image Size.
An Image Size dialog box will appear on the screen where you will have to enter the desired width and height. You can even set up the resolution of your image which is basically the number of pixels per inch. You can enter the desired pixel dimensions for your image here.
ii) Adjust The Aspect Ratio Of Your Image
You can start resizing your image by adjusting the aspect ratio for your crop tool. You will find some preset aspect rotation in the top bar menu with the selection of crop tool. This includes 1:1, 4:5, 5:7, 2:3, and 16:9. Beyond that, you can input any of your preferred ratios manually in the dialogue box.
Selecting these presets automatically adjusts the crop border to maintain that specific ratio. Then click and drag the corner handles and resize your crop area.
When done, press “Enter” or click the checkmark to finalize the crop.
iii) Adjusting The Width and Height
Now adjusting the aspect ratio won’t be enough to resize your photo if you have a specific measure. For instance, there is another resolution adjustment section you will find just under the same drop-down, where you need to enter the height and width of your image.
Like the aspect ratio, you have the freedom to enter the measurement here.
All you need to do is to enter the size in (inches or pixels). When done, press on the Tab and go to the next dialogue box where you need to enter the Resolutions. You can set it at 300 pixels/inch (industry standard resolution ).
Now drag the handle as before and crop the photo keeping the ratio the same. This will ensure you an outstanding outcome of your cropped and resized photo without any distractions.
iv) Resizing With Canvas Size
Canvas size is another photo resizer feature in Photoshop that allows editors to resize or enlarge any image. Increasing the canvas size is like adding empty space around your existing image. Conversely, decreasing the canvas size won’t shrink the image itself but it might clip off the part.
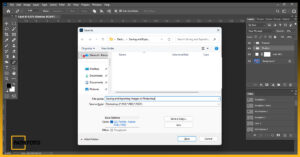
Anyway to use the canvas size, go to the Image menu and then Canvas Size. A dialogue will appear as in the below image.
Change the height and width of the image as you want. Also, you have the option to trim off the image left right, up down, or center as you want. It will resize your image at that specific trimmed option.
V) Resizing Your Image Without Stretching
When you want to resize your photo for social media platforms or print a photo, it’s not uncommon for you to find that your image subject is distracted or stretched. This mainly happens due to adding or removing pixels to achieve the new dimensions when you are increasing or decreasing the image size.
Don’t worry! There are some effective steps you can follow to resize your image by dragging but without stretching the image subjects. Let me show you how:
- All you need to start by duplicating your background layer. Now disable the background layout.
- This is the time when you need to make a selection. Go to the toolbar and choose any selection tool, like Lasso Tool.
- Then make a selection around the subjects of your image. Go to the Select menu and Save Selection. You can rename the selection name as you want.
- Now deselect by pressure ctrl+D and select the Crop tool in the toolbar. Set aspect ratio. Must uncheck the “Delete Cropped Pixels” from the top bar menu and press enter.
- Then again go to the Edit menu choose Content-aware scale and select your selection from protect option. Now you can resize your photo without stretching your image subject.
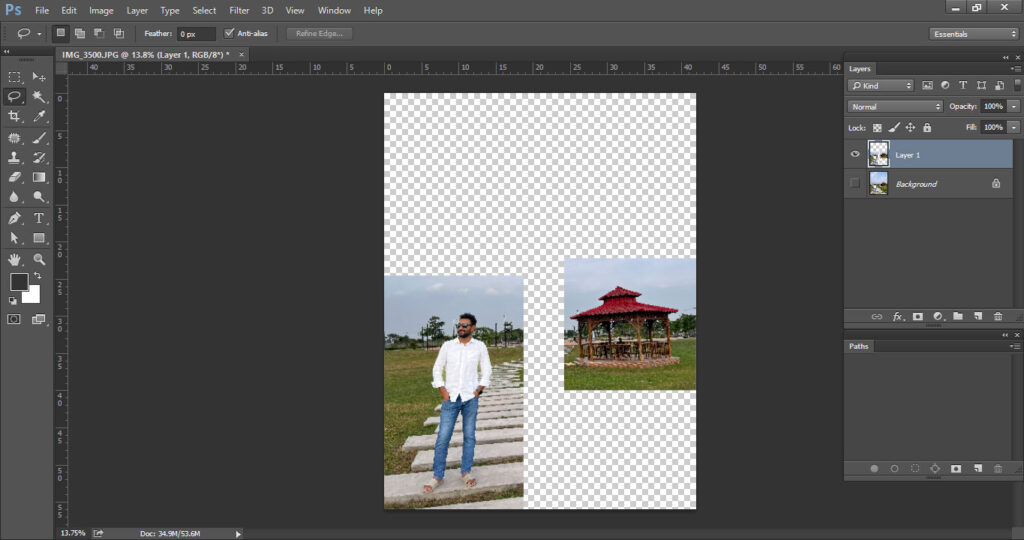
After resizing, this is even possible to split your images if you want. This is how you can do so:
- Right-click the lasso icon and go to the “Lasso tool or Polygonal lasso tool”
- Now click and select each of the image parts that you want to separate.
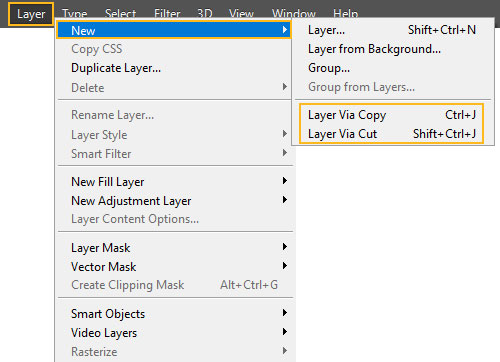
- Then go to Layer click on “New” from the appeared menu and choose Layer Via Copy.

- This will create a new layer containing only the selected area.

- Repeat the same steps for any other sections you want to divide and create separate layers for.
How To Crop Images In Photoshop Non-Destructively?
If you are cropping your image in a destructive way, the biggest concern is that you will delete the rest of the image that is outside of the cropped part and you can’t even restore it.
So, it is always recommended to crop images non-destructively. This effective process keeps your original image data intact. That means you can revert to the uncropped version whenever you want. It is simple to do:
- With the crop tool selection from the toolbar, set the aspect ratio, height, and width of your image
- Now go to the top bare and find the Delete Cropped Pexel.
- Be sure to uncheck it before handling the crop tool and save any of your edits. This is how Photoshop will restore your original image version which you can restore anytime.
How To Crop A Single Layer In Photoshop?
While cropping an image with the two images open in Photoshop, one of the common queries among editors is, how do I use Photoshop to crop an image layer without destroying the overall image quality?
Don’t worry! The processes are quite straightforward. Follow the instructions below and crop a single layer of any of your images in Photoshop.
Step -1: With both images open you will have two layers in the layer panel. Each layer will have a different image or background.
Step -2: Now select the layer image that you want to crop. Then go to the toolbar, and select the Rectangular Marquee Tool.
Step -3: Make a selection around the part that you want to crop.
Step -4: This is the step when you need to resize your selection with transform selection. Simply go to the Select menu and choose Transform Selection.
Step -5: Go to the toolbar and uncheck the Height and Width menu. This will crop your image while keeping the aspect ratio the same. Now drag your Transform handle and resize your image. Save your selection.
Step -6: Once done, inverse your selection from the Select menu and then choose Inverse.
Step -7: Now the time is to crop the layer. Press the Delete key on your keyboard. After that, go back to the Select menu and choose the Deselect option. Now you will find your selected part is successfully cropped without the background layer.
Troubleshooting Common Problems While Cropping and Resizing Images in Photoshop
While using the crop tool in Photoshop, it’s common to face several challenges. Have a look at some of them and their solution ideas on how you will deal with them:
i) Why Can’t I Crop An Image In Photoshop?
If you find any unexpected results like random size or facing hurdles while handling the crop handler, be sure your Crop tool has stopped working. The first thing you can try is to reset the Crop tool.
Here is how to reset the Crop tool in Photoshop: Right-click on the Crop tool icon in the toolbar and select “Reset Tool”. This only resets the Crop tool itself, not other tools you might have used previously. This is an effective trick that will help get the crop tool back to its function.
ii) The Crop Tool Is Not Showing Or Grayed Out in Photoshop
If the Crop tool is missing or grayed out in Photoshop, there are a few reasons and solutions you can try:
- Go to the toolbar and select a tool from there. The best possibility is you are trying to use the crop tool from the image menu.
- Also if your image is on a locked background layer, the Crop tool might be grayed out. Double-click the background layer in the Layers panel and rename it (optional) to unlock it. Or you can create a duplicate layer where you can crop your subject.
- If you’re already using a layer, check and ensure you have selected the correct layer to crop your image.
- Another common reason is that the Crop tool might not be visible in your current workspace. : Go to Window > Workspaces and choose a workspace that includes the Crop tool, such as Essentials.
iii) Losing Details When Cropping
If your image is losing its pixels when it is placed in Photoshop with the crop tool, the best chances are you have kept selecting the Delete Cropped Pixels option on the top menu bar.
Always be sure to uncheck this option to preserve your image details for the future. Otherwise, Photoshop will delete the uncropped part while you just press Enter after copping.
If that is not the case, you can use the Content-Aware fill (or a brush) to fill the gap. Or after cropping and resizing, consider using sharpening filters to add some crispness back to the edges.
Additional tips: Zoom in to 100% view while cropping to better see the crop retention. Use different crop sizes to find the best balance between composition and detail.
iv) Photoshop Crop Image Disappears
When cropping or resizing any image, many of the users find that the image is just disappearing from the screen. If you are also struggling with the same issue, fret not!
Here are some effective fixing ideas you can try out in this instance:
- All you need to start by resetting your Photoshop preference file. It is simple to do that. With restarting your Photoshop, press and hold Alt+Control+Shift for Windows and Option+Command+Shift if you have Mac OS.
- Then you will be asked to delete your Photoshop current settings. Re-launch your Photoshop and create a new preference file.
- In most cases resetting the crop tool will resolve the issue. Just select the tool from the toolbar. Right-click and select the Reset tool from the drop-down menu.
- Most of the users with this issue find the dimension of the crop tool is preset to pixels with a very small number. If that is so, clear it and set the new dimension.
V) Photoshop Crashes When I Try And Resize A File
Photoshop crashes or freezes while resizing an image issue are quite common to the users. The problem is frustrating enough. However, there are a few reasons that might cause this issue.
That includes using outdated software versions, corrupted image files, insufficient system resources or your hardware may have some malfunction.
Whatever the reason is, start troubleshooting the issue as follows:
- As a quick solution, with Photoshop opened in your window, open the ‘Edit’ menu then go to the ‘Preferences’ sub-menu.
- From preference select performance and uncheck the ‘Use Graphics Processor’. Restart your Photoshop and your problem should be solved.
- If not, check and ensure you are using an updated version of Photoshop. If not, launch the updated one.
- Then check the RAM to ensure there is enough space to run Photoshop effectively. Close any other program running at the same time.
- Repair your corrupted image file or if needed run diagnostics to check for any issues in your hardware.
FAQ:
Can I undo a crop if I make a mistake?
Yes, you can do it! Just press Ctrl + Z (Windows) or Cmd + Z (Mac) immediately after cropping. You can also use the History panel to revert to a previous state.
What resolution should I use for printing?
Most professionals recommend 300 dots per inch (DPI), or 300 pixels per inch (PPI) as the ideal resolution for printing. This ensures a sharper image quality with finished results.
What resolution should I use for images on the web?
For web images, a resolution of 72 pixels per inch (ppi) is typically sufficient. This ensures a balanced image clarity and performance on the web. Besides you can expect to have faster loading times for online viewing.
Does resizing an image affect the image quality?
Yes, resizing an image can affect its quality. Enlarging an image can lead to pixelation and loss of sharpness. Besides if you’re reducing its size, it can make details less clear. So you need to use proper resampling methods in Photoshop to minimize these effects.
In Closing
Adobe Photoshop is a powerful and versatile software used for photo editing for various purposes. One of the fundamental skills for any editor is the ability to properly crop and resize an image in Photoshop. Mastering this technique is one of the best skills to create visually appealing and appropriately formatted images.
After this thorough discussion, you should have a better idea now how can do so precisely. Still, if you have any confusion or queries regarding this face, don’t hesitate to contact us. Our professional editor team would love to hear from you.


