Photoshop is a powerful tool to create amazing visuals, but editing and creating aren’t the final steps in the process. You need to save your work correctly for different purposes.
Whether you’ll use it for web, printing, or sharing, the format and size matter. So understanding the right ways for saving and exporting images in Photoshop is crucial. Fortunately, it is straightforward to handle in this software.
Click on “File” in the top menu>”Save As”>Choose the desired format. For web use, go to “File>Select “Export” and then “Save for Web.” Even the process will differ if you are using it for printing or other high-quality needs.
Let’s dive into how you can save and export your images in Photoshop in many more ways to get the best results every time.
How To Save An Image In Photoshop? [All Methods To Know!]
Through this guide, you’ll learn all the essential methods to save images in Photoshop, maintaining all the layers and edits after your long efforts. Here you go!
Method -1: Save
Let’s begin with the basics. If you already have a file on your device and you are editing in Photoshop, after every time you edit, you can save it. Just go to File and select Save. Or as a shortcut, press ctrl+S on your keyboard.
This is for quickly saving changes to the current file. It will keep the same filename, format (like PSD or JPG), and location. And if you want, you can update your ongoing work on the same file.
This offers more flexibility than the Save option in Photoshop. This saving option allows you to export your file in any of the formats you want and lets you store it as a copy in different folders on your computer.
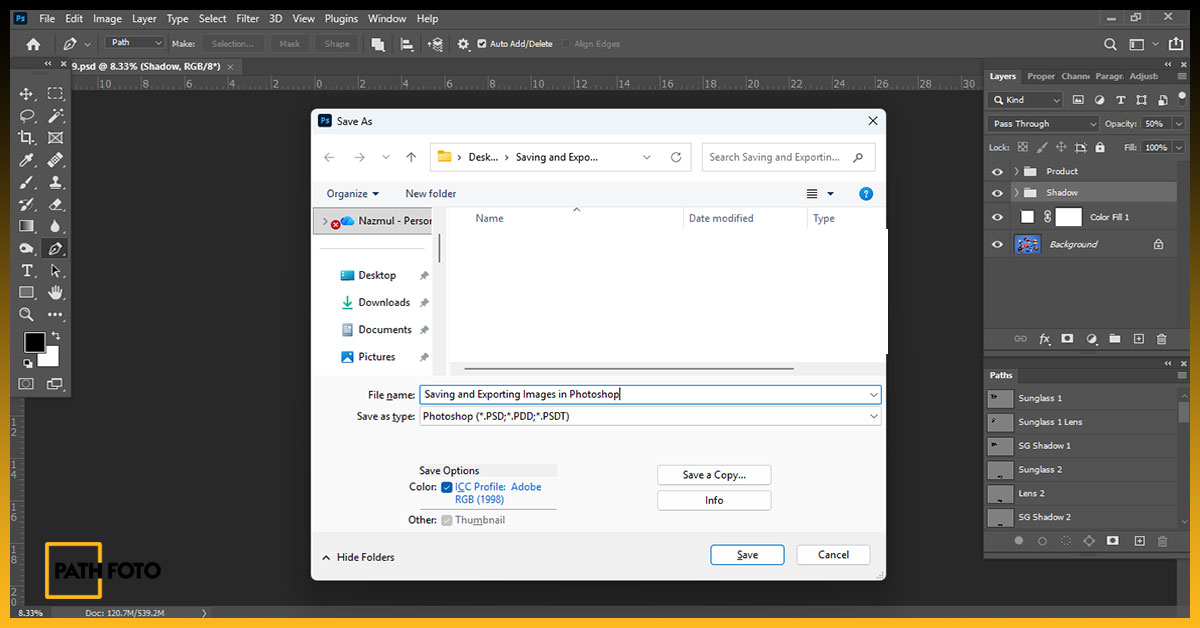
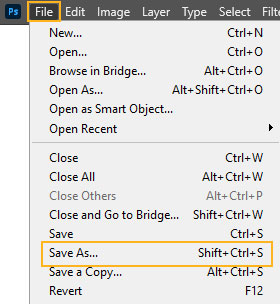
Method -2: Save As
To save a file through this method:
- Go to File>>Save As. As a keyboard shortcut, press Shift+Ctrl+S.
- It will ask you to choose an option from “Save To Cloud Documents” or “Save On Your Computer.”
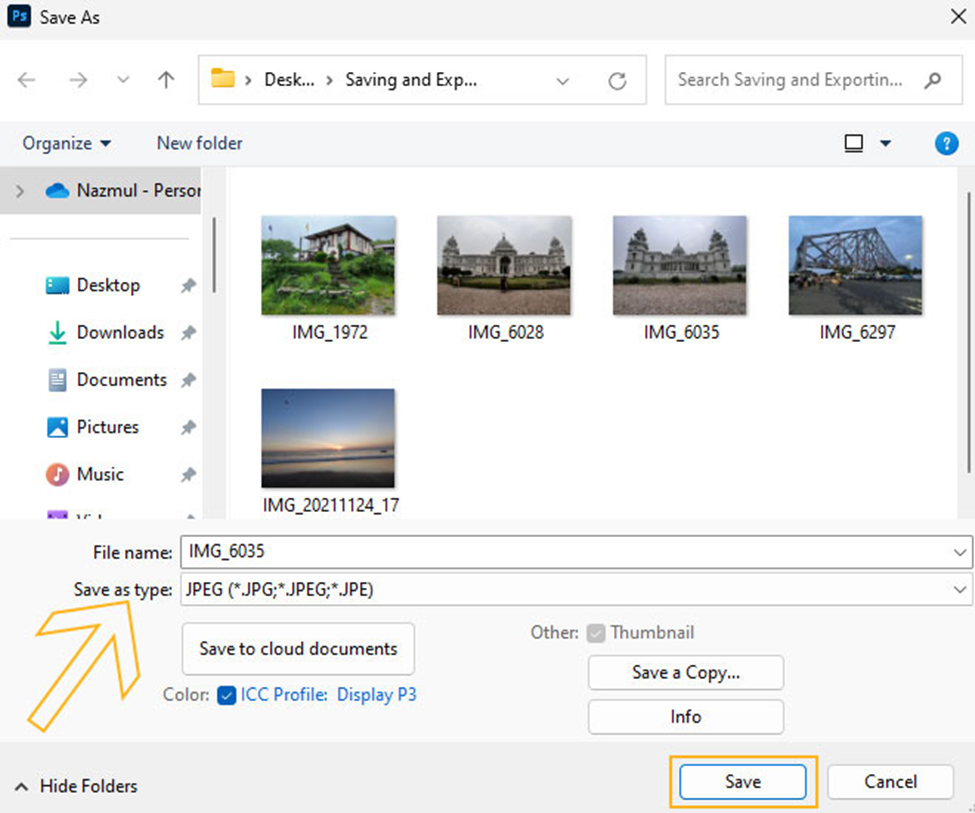
- To export the file, choose “Save on your computer,” and it will redirect to your computer folder, where you can store this file. If needed, change the folder.

- Then rename your project entirely.
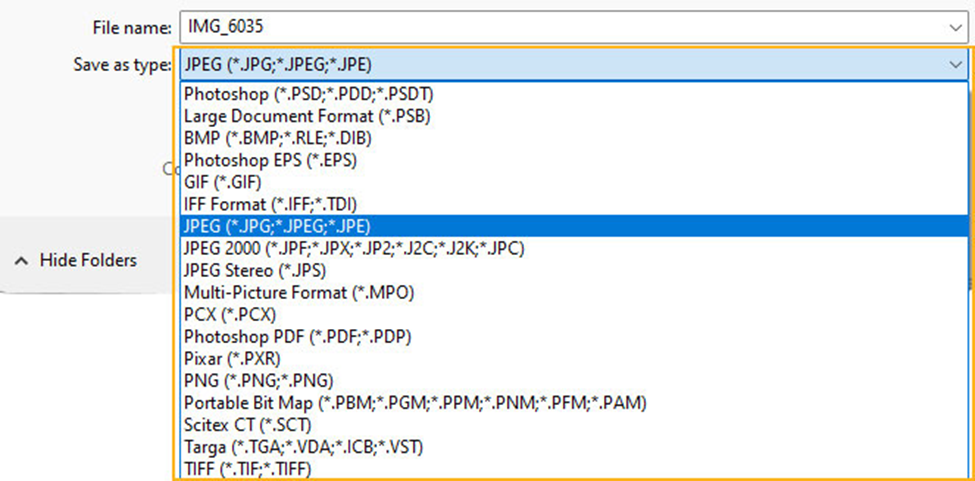
- Pick a different format. You can save it as a JPG, JPEG, PNG, GIF, etc., depending on your needs.
- When done, click on Save, and the file will be exported to that specific folder.
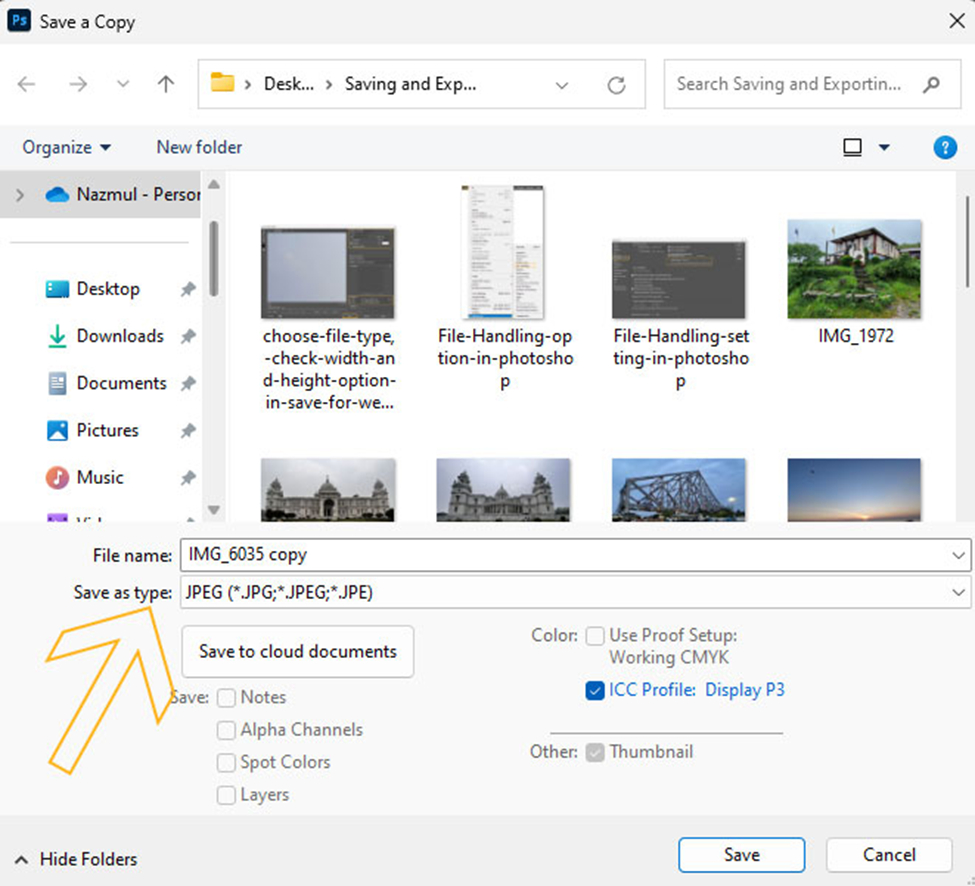
Note: In Photoshop 22.4.2, when you used “Save As” to create a copy, it would automatically add “copy” to the filename. This may not be ideal for everyone.
The good news is it introduces a new preference. This brings back the older “Save As” behavior where you have more control over the filename and it doesn’t automatically add “copy.”.
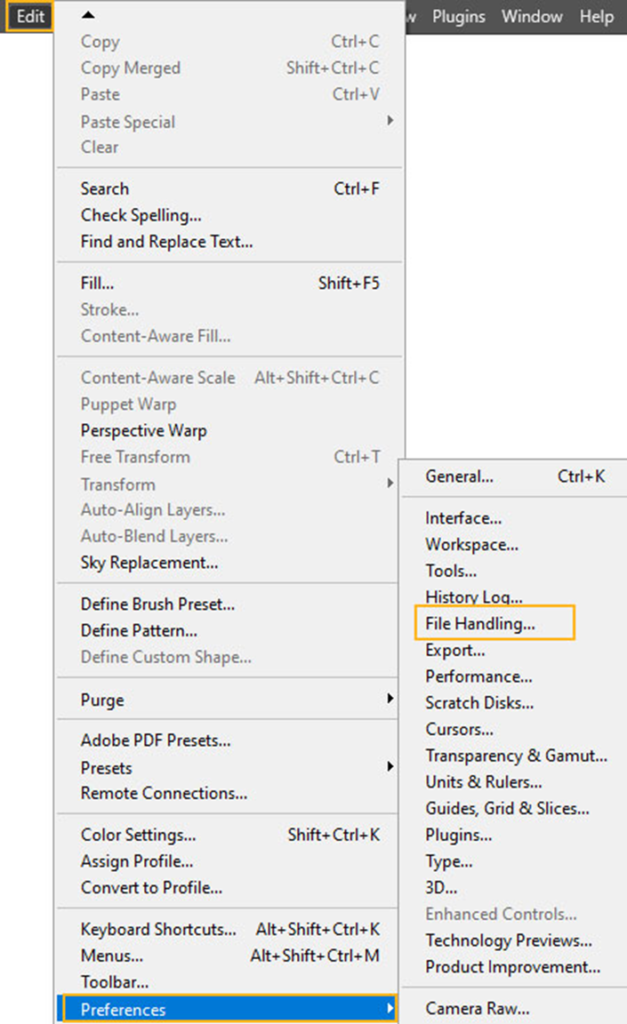
Here’s how to access these new preferences:
- On macOS: Navigate to Photoshop > Preferences > File Handling > File Saving Options.
- On Windows: Go to Edit > Preferences > File Handling > File Saving Options. enable Legacy “Save as” and click OK.
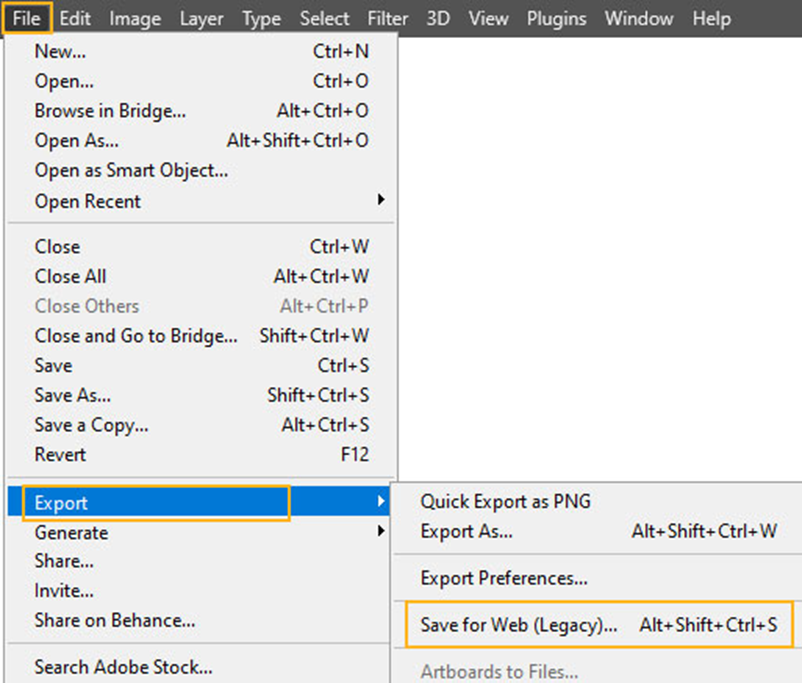
Method -3: “Save for Web”
This is the go-to suggestion when you want to save your image file for a website, banner ads, or social media platform to a specific size and format. When you want to use the image file for a specific platform, maintaining quality and its requirements is quite crucial.
That’s the point, the Save for Web tool in Photoshop comes into play. Here is how you can use it:
- Start by File > Export > Save for Web.

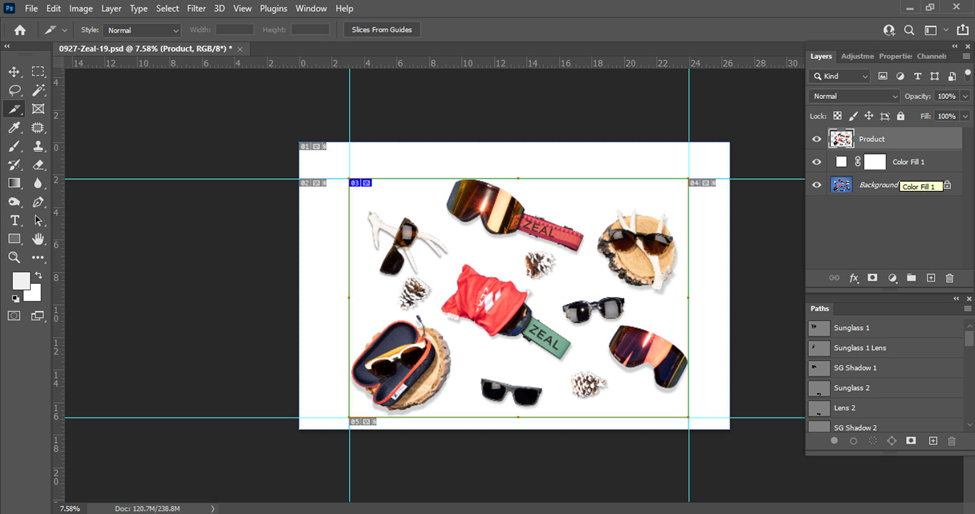
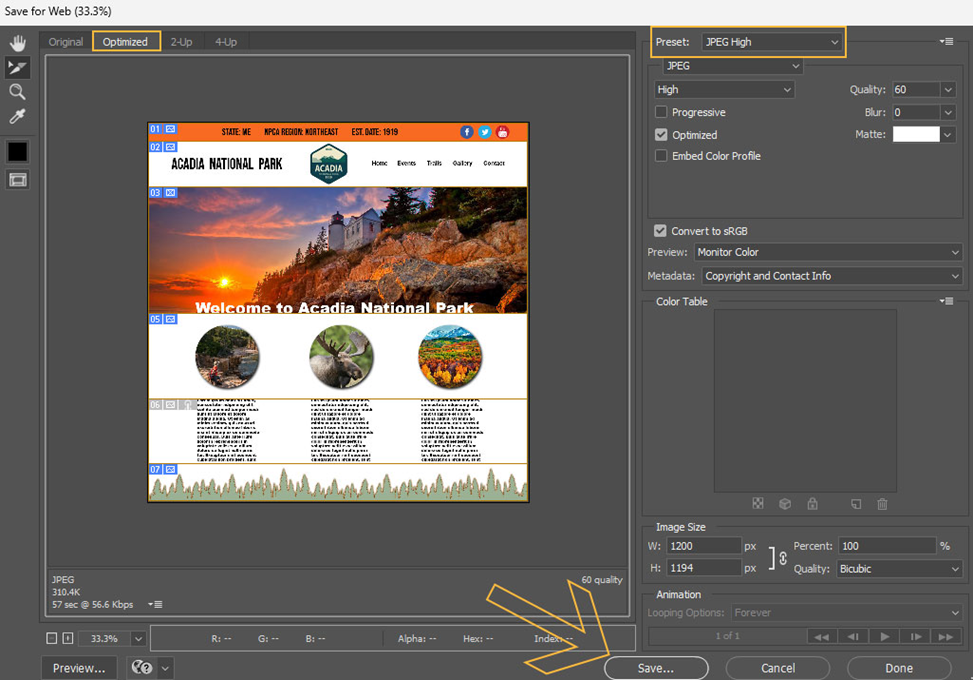
- A dialogue box will appear on the screen, like in the below image

- You will find a few tabs like Original, Optimized, 2-Up, and 4-Up to switch between them. This is mainly used to see the comparison between the original and the new version of the image as a preview.
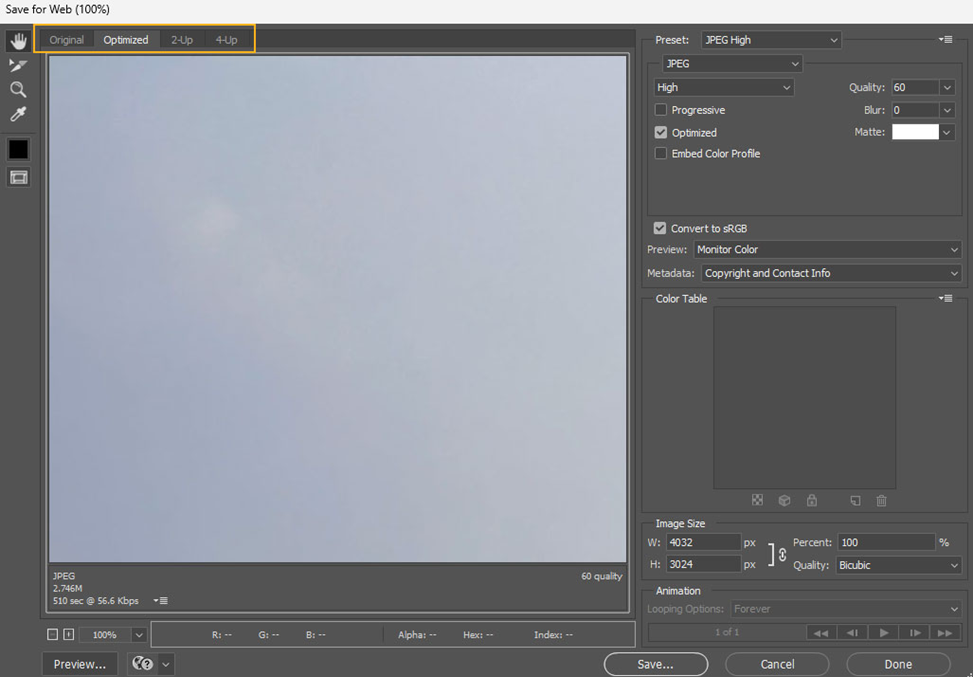
- Now choose file format from the drop-down menu, adjust the sizes, and click on Save. It will redirect you to your device folder, rename your image file, and hit Save to complete the export.
Additional Tips:
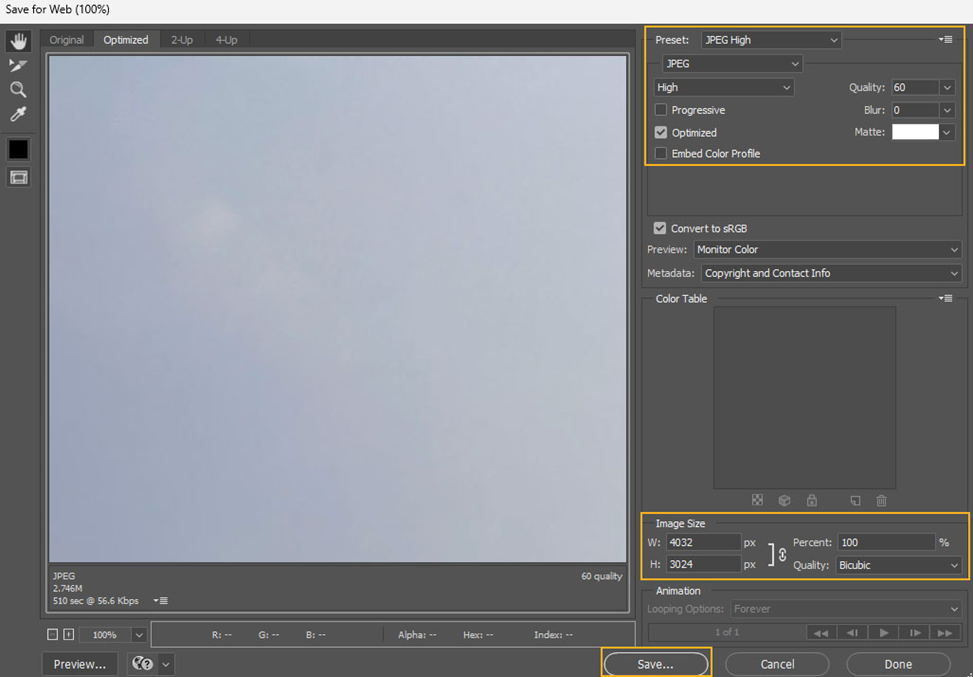
In the right panel of the Save For Web options, you’ll see a preview of your image and various settings. Let’s have a look at how you will adjust it to save high-resolution images for the web:
| i) File Format: It is best to use JPEG (JPG). It offers good compression for photographs while maintaining reasonable quality. You can use PNG-24 or PNG-8 for graphics with transparent backgrounds like logos. Note that: For maximum quality, set the JPEG Quality to 100. Besides, PNG-8 offers a smaller size but has limited color options that are up to 256 colors. ii) Image Size: Now coming to the image size. Resizing your image will change your file size as well. For most website layouts, a maximum width between 1200px and 2000px is a good starting point. iii) Quality Level: When you are setting in JPEG format, it lets you set the quality level to make a good balance between image quality and file size. A lower quality (around 40-60) creates smaller files for faster loading, but aim not to go too low to avoid excessive blurriness. |
Method -4: Save a Copy
This is another great option to save a file in Photoshop when you want to create a new version of your current file with a different name while keeping the original file untouched. The key advantage is that you can edit the copy freely, as you already know that you can always revert to the original if needed.
However, here’s how to use the “Save a Copy” option in Photoshop:
- Go to File > Save As (or press Ctrl + S or Command + S).
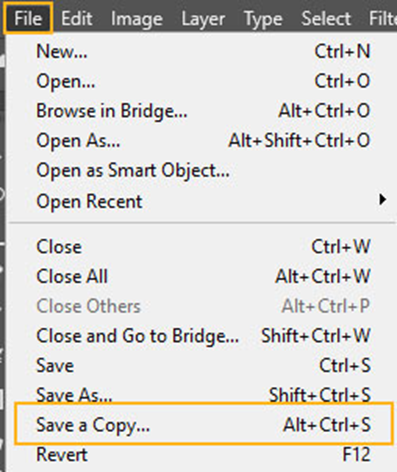
- In the “Save As” dialogue box, you’ll typically have a dropdown menu for selecting the file format.
- Now, look for a button or checkbox near the format dropdown menu labeled “Save a copy.” Click this button and activate the “Save a Copy” function within the “Save As” workflow.
Method -5: Auto Save
Now that you want to automatically save a copy of your current document without interrupting your workflow, Photoshop even makes it possible for you. For instance, you need to enable this feature in your Photoshop:
- Go to Edit > Preferences > File Handling.
- Then, checkmark the box that says “Automatically Save Recovery Information Every.”
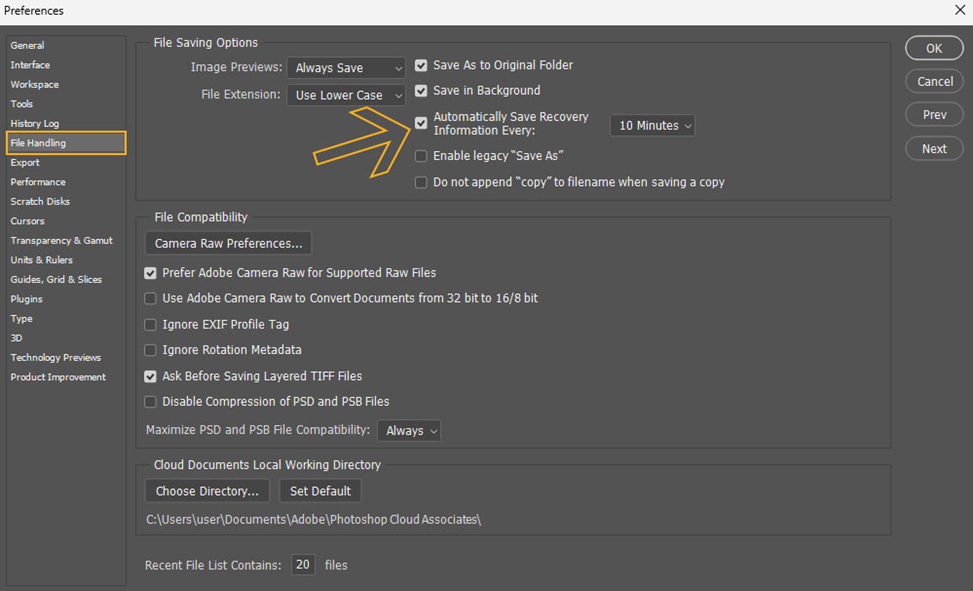
- Now you can set up your time duration from 5 to 60 minutes. Also, you can choose a location where you want to save your document.
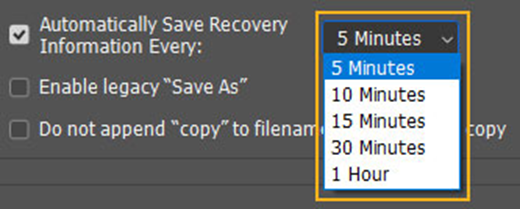
- When done, click OK and apply the changes.
In various instances, you need to save your image in vector format to preserve editability for future changes. Here is how you can do it in Photoshop:
- Make sure your image is saved in PSD format. This is crucial as it maintains all layers and text.
- Now open the PSD file in Photoshop. A dialogue box highlighting “Photoshop Import Options” will appear on the screen. Click “OK” and keep the text and layers editable.

- Then locate the text layers in the Layers panel. Go to the very first layer, right-click on it, and go to the “Convert to Shape” option. This changes text into vector shapes.
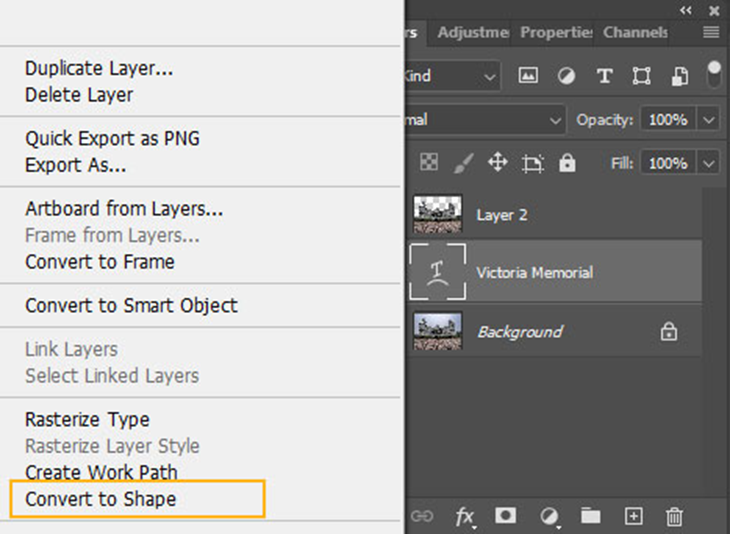
- Finally, save your image.
Method -6: Quick Export as PNG or JPEG
Think of it like you have multiple images in your Photoshop workspace, and you want to export them as JPEGs or PNGs with the same settings. “Quick Export As” lets you do it with a single click. Also, it is a handy option when you need to share an image quickly or use it in another application.
Here is how you can use it to save an image in JPEG in Photoshop:
Go to File>>Export>>Export AS JPEG and save your image.
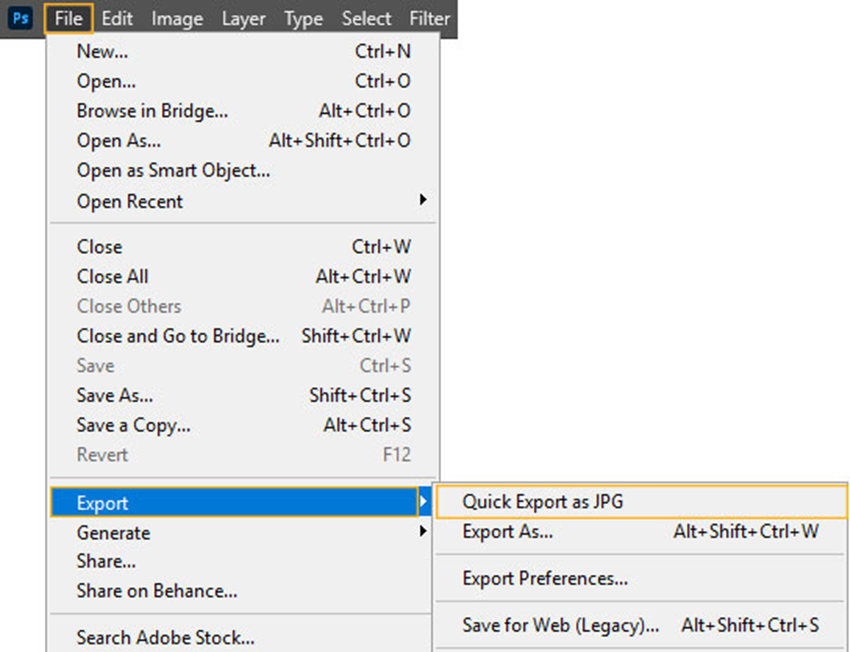
However, if you don’t find the JPEG options right there, you need to make a small adjustment. Choose File>Export>Export Preferences. A pop-up window will appear.
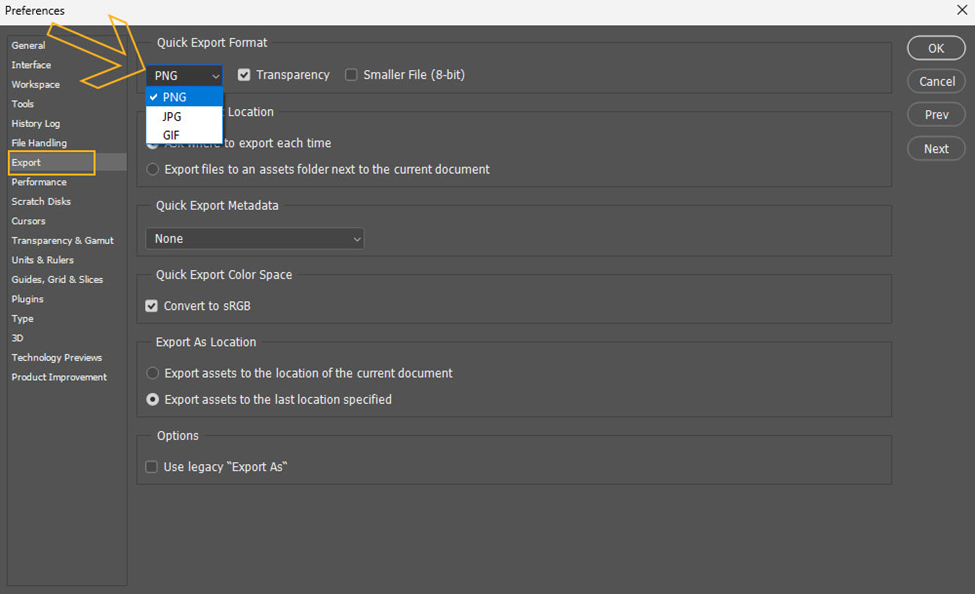
Change the format from PNG to JPEG and click OK. Now you can use Quick Export As JPEG.
How to Save Large Documents in Photoshop?
When editing an image, it is not uncommon when you have to deal with a large file in Photoshop, and you may need to find the right way to save it. If it is Photoshop’s default format version, PSD can support only 2 GB or an image with 300,000 pixels.
So what’s the solution right there?
TIFF format—that files up to 4 GB in size. The good thing is that it preserves the layers and other edits after saving. As being a universal format, you can open this larger file in any image editing software.
Now the question is, what to do when you have a larger than 4 GB file?
In this instance, saving a file in PSB format can be a go-to solution. It works great with any big images or large-scale projects and saves features like layers, masks, and other complex edits effectively. The only downside is it is a bit slower and less compatible with other Adobe apps.
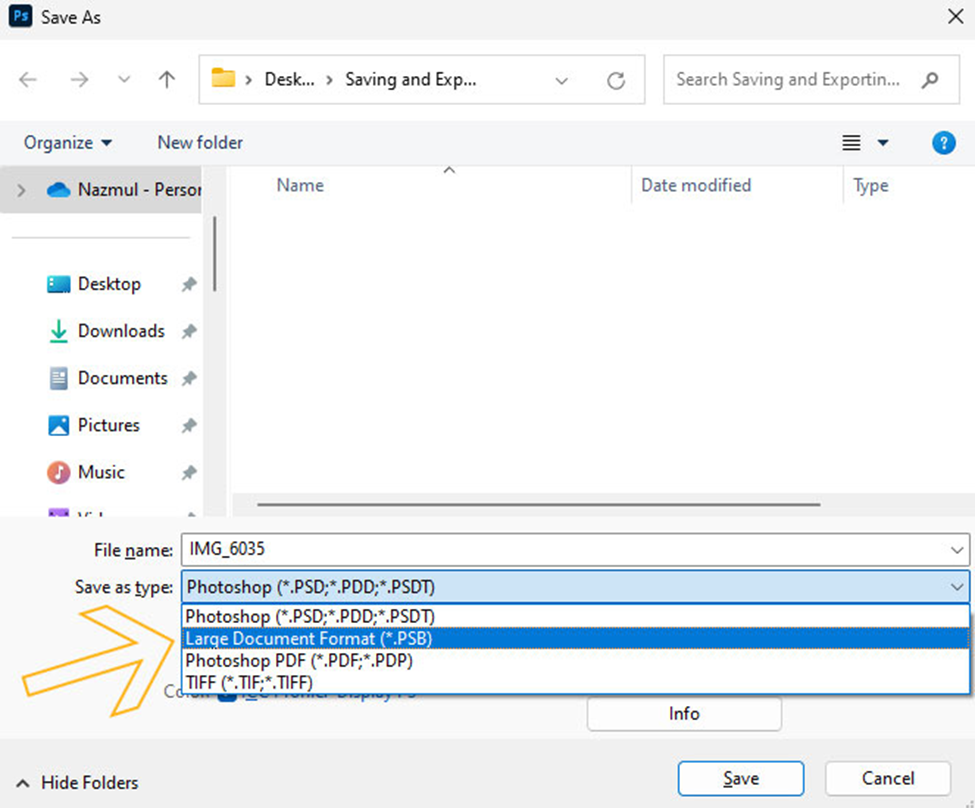
To save this file in this format, go to File>Save As. Now choose “Large Document Format (*PSB)” as the format. Click “Save” and export it.
Save & Export Individual or Multiple Layers to Files
Now coming to the most important part of today’s discussion. This is basically when you have multiple subjects in different layers in a single image, and you want to save a layer. Then what should you do there? Relax, Photoshop brings solid solutions here as well!
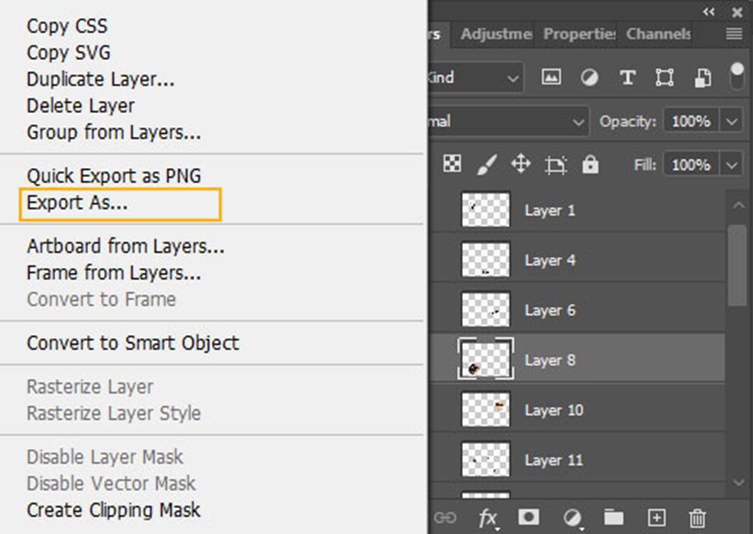
Right-click on the layer you want to save and select “Export As” from the drop-down menu. It will redirect to your device folder where you want to save the file.
Enter the name of the file and choose any of the formats (PSD, BMP, JPEG, PDF, Targa, or TIFF) from the drop-down options and click on Save. You can do the same from File>Export>Layer to files. A dialogue box will appear. Adjust the settings, and save.

In case you want to save more than one layer at a time, just hold the Ctrl or Command for Mac and select multiple layers at once.
Now right-click and go to the export as before. Choose your file format, resize it if you want, and click on Export to save the files as separate images on your device.
Saving a Photoshop File in GIF Format
GIFs are the only common image format that displays animation. So when you have a simple animation in Photoshop, like a short banner ad or a small looping image, you only have to save the file in GIF format.
Well, it is quite easy to transform an image into a GIF through Photoshop. Here is what you need to do after completing the animation:
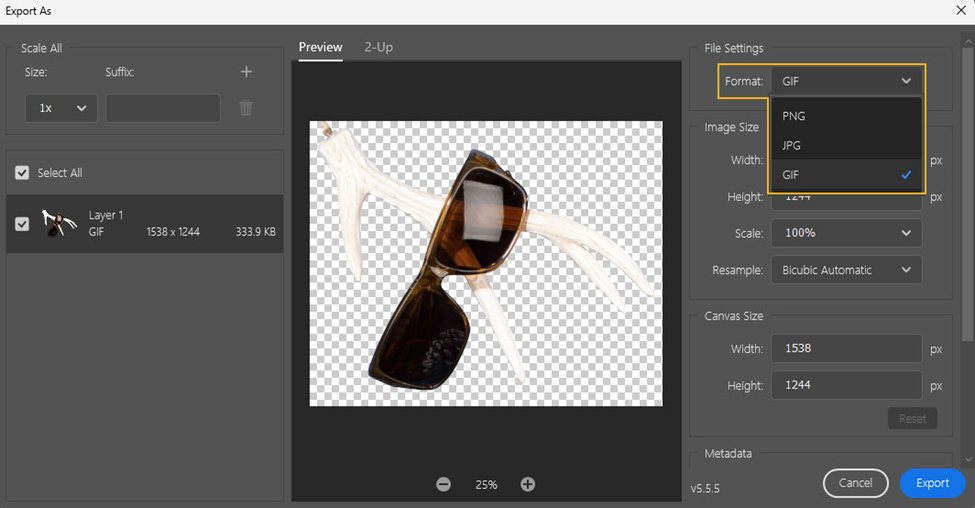
Go to File>Export>Export As and this window will open on your screen. Now go to File Settings and change the format to GIF. Change the file size if needed and click OK.
Exporting a Photoshop File in HTML:
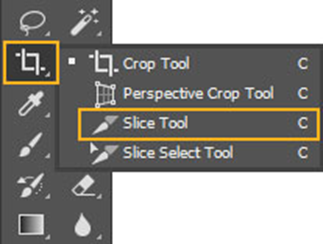
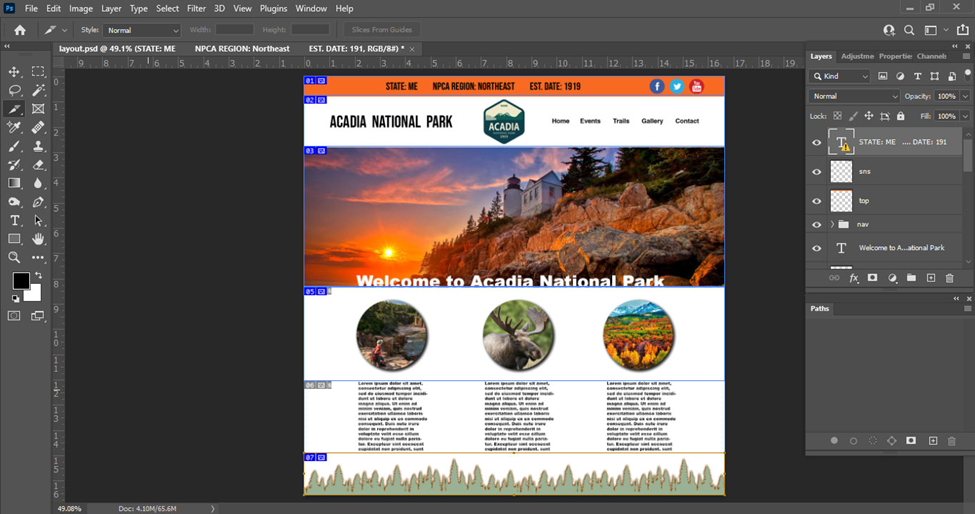
If you are handling a website and want to convert your design to HTML to make things easier, you can easily do it via Photoshop. All you can do is cover the PSD file in HTML with the use of the Slice tool. Here are the details.
- Open your PSD file in Photoshop and choose the Slice Tool from the toolbar.
- Now draw slices in your image subjects manually. Slice each of the subjects of your image or the parts that you want to export into an HTML file.
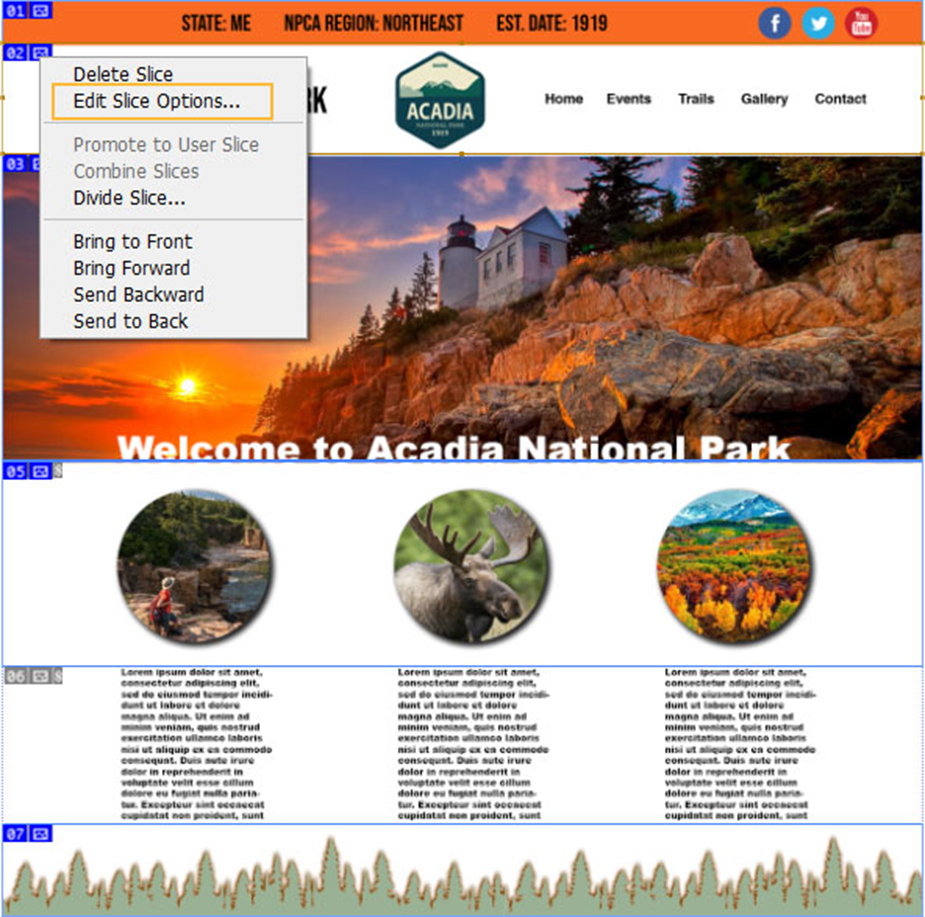
- For slicing in group, hold down the CTRL key and tap on the blue tab indicating custom slicing in your image. Choose Divide Slice from the appearing options, and you will find all your slices divided.
- Now to equally space between the divided slices, choose “Slice Select Tool” and customize your slicing. After slicing, you can rename each slice. Just right-click on the slice and select Rename.
- Do the same for the rest of your images. To make editable any of your slices for further editing, just hold down the ctrl button and click on the blue tab as before.
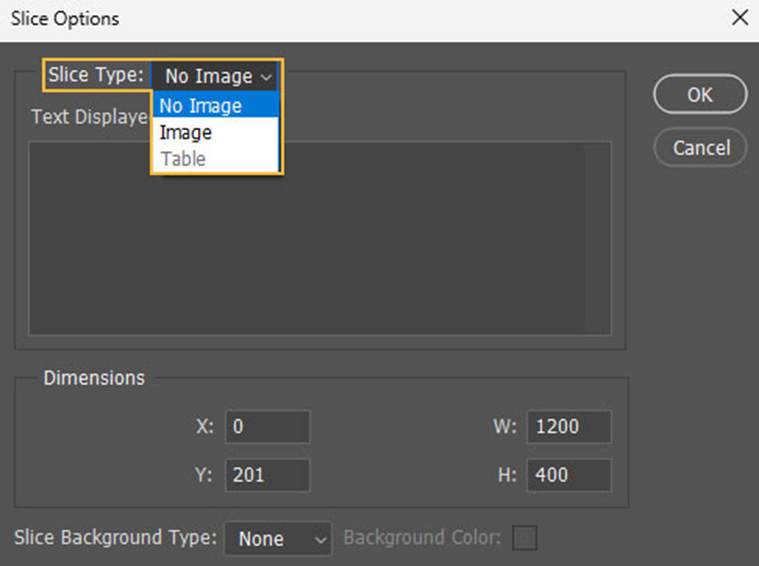
- Choose the Edit Slice Options. Then head to Slice Type and choose “No Image” from the drop-down menu. Click Ok to apply your edits.
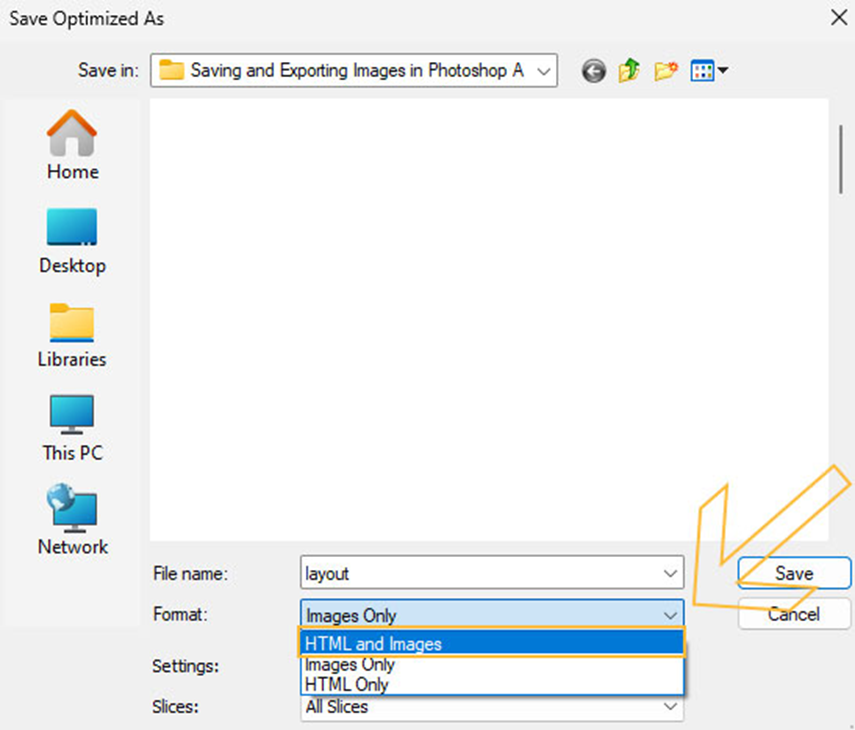
- When your slices are ready, go to File > Export > Save for Web (Legacy) and save the slices. Now go to the Optimized option, select all your slices, and set the preset as “JPEG High.” Click “Save it” and choose the folder where you want to save it on your device.
- Make sure to choose the format “HTML and Images.” Finally, tap on “Save” and save your HTML file.
Saving Images in Photoshop for Print
When you’re about to save a ready image file in Photoshop for print, ensuring the highest quality is always desired. For instance, here is a quick guide you can follow to prepare your image for print:
i) Start with a High-Resolution Image:
Printing typically requires a higher resolution than screen viewing (72 PPI). A good rule of thumb is 300 PPI for high-quality prints.
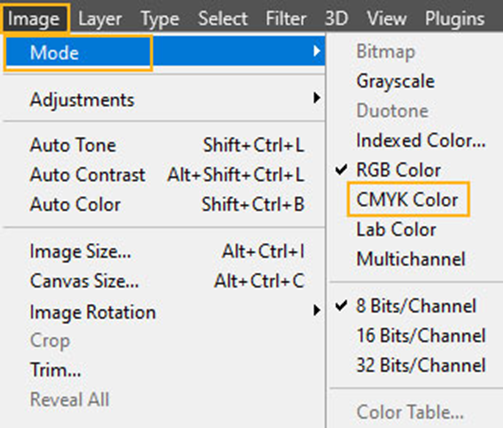
ii) Using CMYK Color Mode
While printing an image, you will find several color-setting features in Photoshop. Monitors display images in RGB mode (Red, Green, Blue). But typically, printers use CMYK mode (Cyan, Magenta, Yellow, Black).
Go to Image > Mode > CMYK Color and choose Color Mode. This ensures accurate color translation during printing.
iii) Cropping and Composition:
In most cases, cropping an image in Photoshop is a great option to ensure a better outcome after printing. Use the crop tool and adjust the image composition for the desired print size.
To save for Print:
- Go to File > Save As (or press Ctrl + S or Command + S).
- Now choose the file format TIFF (TIF). This ensures a high-quality, lossless image, ideal for professional printing. Also, you can choose JPEG (JPG) in case you have smaller file sizes.
Common File Formats for Saving Images in Photoshop
After this thorough reading, you have come to know that there will be a different file format you find when saving an image in Photoshop. Here is a quick preview of the pros and cons of each format you should know to ensure the best uses of them:
| Format | Pros | Cons |
| .TIFF | Widely supported by most image editing software and printing services. preserves image data without any quality loss. Supports various color modes (RGB, CMYK) and layers | Not ideal for web use due to large file size |
| .JPG | Uses compression for smaller file sizes, suitable for web and email. Widely used format compatible with most devices and platforms | Not ideal for text or graphics due to compression. |
| .PNG | preserves image data for good quality Supports transparent backgrounds, ideal for logos and graphics. Best use for web graphics with transparency | Can be larger than JPGs, especially for complex images with many colors. |
| .PSD or .PDD | Preserves all layers, masks, effects, and editing information for maximum flexibility. Ideal for complex image editing projects with multiple elements. | Can be very large due to the extensive data stored. |
| .RAW | Offers non-destructive editing Highest quality, large file size | Needs compatible software for processing and viewing. |
Why Won’t Photoshop Save My Images?
While editing images in Photoshop, there are various instances when you may have to struggle to download images in Photoshop. Well, there are several factors to blame here. Such as:
1. Incorrect File Size
The image you are trying to download may be too large than usual or you are not following the right instructions. For instance, you can try reducing the file size and then downloading it.
2. File Type
In most cases, the latest Photoshop versions limit the file types that you want to save based on your file’s content. For example, if your file has layers, you can only save it as a PSD, PSB, or TIFF. You won’t find the JPEG or PNG to support all the formats.
As a solution, you can use File > Save a Copy and save the images in JPEG, PNG, or other formats. This will let you save images without affecting the original image.
3. Unsupported Content
If you’re finding it hard to save a PSD file as a PDF, the chances are it might contain unsupported elements like certain layer effects, or smart objects that cause errors. If so, remove complex elements that fail to convert well to PDF. You can also save it as TIFF instead, which supports larger and more complex images.
4. Color Space
If you are failing to save an image as JPEG, chances are you are using the wrong color space. (like ProPhoto RGB. Or it might be a 16-bit image. Typically Photoshop requires 8-bit or sRGB to export the image effectively.
Go to Image > Mode and set it to 8 bits per image. This will help you to save your image in JPEG. To change the color of your image to sRGB, go to Edit > Convert to Profile and set the color space.
FAQ:
What file formats are best for web use in Photoshop?
For web use in Photoshop, JPEG and PNG formats are commonly used. JPEG is great for photographs, while you can choose PNG to save your images with transparency, like logos or graphics.
How to ensure color accuracy for uploaded images in Photoshop?
For maximum color accuracy, you can export image files with the sRGB color profile. In case your image has CMYK elements, use the “Convert to sRGB” option when saving to ensure colors match your intent across devices.
Can I save images with transparent backgrounds in Photoshop?
Yes, you can save images with transparent backgrounds in Photoshop. Use the PNG format, as it supports transparency. Click “File” > “Save As” and choose PNG from the format options.
Can I compress an image without losing too much quality?
Yes, you can compress an image without losing much quality in Photoshop. Use the “Save for Web” option and adjust the quality slider. All you need to make a good balance between file size and image clarity,
In Closing
Whether you’re a beginner or an expert, understanding the right process to save and export images is the same essential as editing an image. After all, you’d never want to let all your long-hour editing efforts just go in vain.
After this thorough reading, I bet you are not in such uncertainty about how you will effectively optimize your image file after editing and downloading it.
In case, you’ll have any queries or confusion while implementing any of the above-suggested methods, don’t hesitate to reach out to us. Our expert editors will guide you right there to safeguard your edits.